Tuesday, August 3, 2010
Don't forget: I've Moved!
Just another reminder to change your bookmarks and point your Google Readers to my new blog: Cook, Pray Love. All of the same content, just a different name and location!
Thursday, July 15, 2010
I've Moved!
Friends and readers,
It's been a great two years over here at Food alla Puttanesca, but the time has come to change the name to something that reflects more of me and my ministerial vocation.
So set your browsers and Google Readers over to Cook, Pray, Love for a delicious enchilada recipe, a fabulous GIVEAWAY! and the same content and delicious food that you've enjoyed here. I'll see you over there!
Thanks for reading!
Monday, July 12, 2010
Cold-Brewed Iced Coffee

Considering that I'm a graduate student, I'm actually not that big of a coffee drinker. Too much caffeine makes me jittery and scatter-brained, not so good when I'm trying to follow complicated theological arguments. But iced coffee in the summer is a different story. It's refreshing and cooling without that bitterness that some hot coffee can produce. I like it so much, that I'm going to have to start making this from decaf coffee because I want to drink it all day long. I pour in a splash of milk, a tablespoon of sugar-free hazelnut syrup, and shake it all up in a Mason jar. The recipe can be easily multiplied. I usually make 4 jars of the coffee concentrate at a time and just strain and store in the refrigerator.
Cold-Brewed Iced Coffee
source: New York Times
Yields 2 drinks
Ingredients
1/3 cup medium-coarse ground coffee
1 1/2 cups water
Preparation
In a jar, stir together coffee and water. Cover and let rest at room temperature overnight or 12 hours. Strain twice through a coffee filter, a fine-mesh sieve or a sieve lined with cheesecloth. In a tall glass filled with ice, mix equal parts coffee concentrate and water, or to taste. If desired, add milk.
Wednesday, July 7, 2010
Cantaloupe Soup with Prosciutto and Mozzarella Sandwiches

Everyone knows that cantaloupe and prosciutto go well together. Those prosciutto-wrapped cantaloupe balls leave me longing for a melon baller, but it's not exactly dinner. But a chilled soup and a baguette sandwich? Add a glass of white wine, and we are definitely talking. It helps because Joe doesn't think he likes cantaloupe. Too many bland, hard chunks of cantaloupe in generic fruit salads will do that to you. This was a local melon, full of juice and sweetness brought out ever so slightly by the salt. The recipe is easily halved, which I did. This is also a great summer meal because it doesn't use any heat (provided you don't bake your own baguette). Cool, crisp, and quick to make.
Cantaloupe Soup with Prosciutto and Mozzarella Sandwiches
source: Real Simple
2 baguettes
2 8-ounce balls fresh mozzarella, thickly sliced
1/2 pound sliced prosciutto
2 tablespoons extra-virgin olive oil
2 cantaloupes, chilled, halved, and seeded
1/2 teaspoon kosher salt
1/4 teaspoon black pepper
16 fresh mint leaves, thinly sliced
Preparation
Cut each baguette in half lengthwise, then in thirds crosswise. Layer the mozzarella and prosciutto on the bottom of each baguette portion. Drizzle with the oil and sandwich with the baguette tops; set aside.
In a blender, puree the cantaloupe and salt. Pour into bowls and sprinkle with the pepper and mint. Serve with the sandwiches.
Friday, July 2, 2010
Summer Berry Pie

I never want to actually make anything with fruit because I prefer to eat it on its own or in cereal or with yogurt. But around this time, when its prime berry season, I can justify getting more berries to use in desserts. Fruit desserts are my favorite kind of dessert anyway, especially in the summer.
I made this for a party that our HOA threw for the 4th of July, except it was on the 1st since a lot of people would be going out of town. Most of the people that live in our condominium complex are empty-nesters or single, older people with grandchildren around my age. It's kind of like living with a bunch of grandparents because they're all really nice and want to talk to us all the time. They also loved this pie. Given the plethora of desserts on the table, I thought I would be taking a lot of this home, but I only had about a 1/3 of it left. Everyone wanted to know what made up the filling. The filling is pureed berries, strained, and then cooked with cornstarch to thicken it. It sets up beautifully in the refrigerator, and a lot of people guessed that it was jam. The other nice thing about this pie is that it isn't too sweet, just very refreshing for a hot summer evening.
Summer Berry Pie
source: Annie's Eats
Ingredients
For the crust:
5 oz. graham crackers (approx. 9 crackers), broken into rough pieces
2 tbsp. sugar
5 tbsp. unsalted butter, melted and warm
For the filling:
2 cups raspberries (about 9 oz.)
2 cups blackberries (about 11 oz.)
2 cups blueberries (about 10 oz.)
1/2 cup sugar
3 tbsp. cornstarch
1/8 tsp. salt
1 tbsp. freshly squeezed lemon juice
2 tbsp. strawberry jam
Preparation
To make the crust, adjust an oven rack to the middle position and heat the oven to 325 degrees. In a food processor, process the graham crackers into fine, even crumbs (you should have about 1 cup of crumbs). Combine the graham cracker crumbs, sugar, and melted butter in a small mixing bowl and toss with a fork until all the crumbs are moistened. Transfer the crumbs to a 9-inch glass pie plate. Use the bottom of a ramekin or measuring cup to press the crumbs evenly into the bottom and up the sides, forming a crust. Bake in the preheated oven until it is fragrant and beginning to brown, 15-18 minutes. Transfer to a wire rack and cool completely while making the filling.
For the filling, combine the berries in a large colander and gently rinse (taking care not to bruise them). Spread the berries on a paper towel-lined rimmed baking sheet and gently pat dry with additional paper towels.
In a food processor, puree 2 1/2 cups of the mixed berries until smooth and fully pureed, about 1 minute. Strain the puree through a fine mesh sieve into a small nonreactive saucepan, scraping and pressing on the seeds to extract as much puree as possible (you should have 1 1/4 to 1 1/2 cups). Whisk the sugar, cornstarch, and salt in a small bowl to combine, then whisk the mixture into the puree. Bring the puree to a boil over medium heat, stirring constantly with a wooden spoon; when the mixture reaches a boil and is thickened to the consistency of pudding, remove from the heat, stir in the lemon juice, and set aside to cool slightly.
While the puree is cooling, place the remaining berries in a medium bowl. Warm the jelly (or jam) briefly in the microwave to melt it slightly. Add the warmed jelly to the bowl of mixed berries and toss very gently so that all the berries are coated. Pour the berry puree into the cooled crust and smooth with a rubber spatula. Evenly distribute the glazed berries over the puree and gently press into the surface. Loosely cover the pie with plastic wrap; refrigerate until chilled and the puree has set, about 3 hours (or up to 1 day). Slice with a hot, dry knife and serve.
Wednesday, June 30, 2010
Pizza with Prosciutto, Peppers, and Goat Cheese

I've mentioned before how I'm pretty sure that dough can smell fear and anxiety. If I'm in a rush, the gluten strands just will not relax no matter how much time I give them. But on Sunday, I got my pizza dough thinner than I ever have before. I had frozen a 1/2 batch of it, and I got it out Sunday morning to defrost. By the time dinner came around, it rolled out like a dream. And with toppings of goat cheese, prosciutto, and red pepper (arranged artfully by Joe), this pizza was one of the best I had ever made. I will definitely be making pizza more often now.
Pizza with Prosciutto, Peppers, and Goat Cheese
adapted from Kelsey's Apple a Day
Ingredients
1/2 batch pizza dough (I use Bridget's recipe.)
Cornmeal for sprinkling
1 roasted red pepper, sliced into strips
1/2 cup tomato sauce
2 oz goat cheese, crumbled
2 oz prosciutto, sliced
1/4 cup chopped fresh basil, divided
salt and freshly ground pepper, to taste
Preparation
1. Preheat oven and pizza stone at 500 degrees F for 30 minutes.
2. Sprinkle your work surface with cornmeal and prepare the dough by shaping it with your hands. Brush lightly with olive oil.
3. When oven and pizza stone have been at temperature for 30 minutes remove the pizza stone and transfer pizza dough. Use a fork to prick a few holes in the dough. Bake for five minutes.
4. Remove the partially baked crust. Top with tomato sauce, prosciutto, peppers, goat cheese, and half the basil. Bake for 7-8 minutes more, or until crust is golden brown on the outer edges.
5. Allow to cool three minutes, then top with the remaining basil, salt, and pepper and serve.
Tuesday, June 29, 2010
Corn and Basil Cakes

The last time we were at Trader Joe's, I gave in and bought a basil plant. Our condo has exactly three windows (though they are big windows!), so there were only a few places I could put it. Now it balances on the top of the piano, and I pray that the cat doesn't knock it over. Because there's no better time than summer to have access to fresh basil. And for the price I bought that plant for, I could buy about one small plastic clamshell of basil. However, I don't know if I would have thought to use the basil in a savory corn pancake. But then again, that's why I read cooking magazines. These cooked perfectly, and the crunch and sweetness of the corn went beautifully with the basil. Plus, they're quick. And who doesn't like having pancakes for dinner?
Corn and Basil Cakes
source: Eating Well August 2010
Yields 10 cakes (But I only got 9)
Ingredients
1/2 cup white whole-wheat flour or all-purpose flour
1/2 cup low-fat milk
2 large eggs
2 tbsp canola oil, divided
1/2 tsp baking powder
1/2 tsp salt
1/4 tsp freshly ground pepper
2 cups fresh corn kernels (about 2 large ears)
1/2 cup chopped fresh basil
Preparation
1. Whisk flour, milk, eggs, 1 tbsp oil, baking powder, salt and pepper in a medium bowl until smooth. Fold in corn and basil.
2. Brush a large nonstick skillet or griddle lightly with some of the remaining tablespoon of oil. Heat over medium heat until hot (but not smoking). Cook 4 cakes at a time, using about 1/4 cup batter for each, making them about 3 inches wide. Cook until the edges are dry, about 2 minutes. Flip and cook until golden brown on the other side, 1 to 3 minutes more. Repeat with the remaining oil and batter, making 10 cakes total. Reduce the heat as necessary to prevent burning.
Monday, June 28, 2010
Grilled Zucchini Salad with Lemon, Almonds, and Parmesan

Even with only a half-share at our CSA, it's still slightly more produce than Joe and I can consume by ourselves, which gives us a great reason to have people over and take vegetables over to other people's parties. While I usually eat zucchini and summer squash lightly sauteed with a little garlic and olive oil, that can get a little tiresome. When I saw this grilled zucchini salad in the latest issue of Eating Well, I thought it would be a great addition to our Top Chef-watching party. I'm not sure if it completely balanced out the peanut butter-honey gelato, wonderful cookies from Love and Olive Oil, and the peanut butter pie, but I made a good faith effort! I altered the recipe slightly to make it a little easier. This would be perfect for a picnic or winery outing, especially since it's so good served at room temperature.
Grilled Zucchini Salad with Lemon, Almonds, and Parmesan
adapted from: Eating Well August 2010
Ingredients
1 medium lemon
2 tbsp extra-virgin olive oil
1/2 tsp freshly ground pepper
1/4 tsp salt
2 lbs small zucchini, cut into lengthwise slices
1/2 cup sliced (or chopped) almonds, toasted
1/3 cup grated Parmesan cheese
Preparation
1. Zest the lemon and set aside the zest. Squeeze the juice from the lemon into a small bowl. Add oil, pepper, and salt, and whisk to combine. Set aside.
2. Preheat grill or grill pan to medium-high heat until hot. Oil the grilling surface and grill zucchini slices, turning once, until tender, 6 to 8 minutes.
3. Arrange the zucchini on a platter and drizzle with the reserved lemon dressing. Serve sprinkled with almonds, cheese, and lemon zest
Tuesday, June 22, 2010
Chocolate Sorbet

No, I didn't mislabel this post. This is chocolate sorbet, not chocolate ice cream. Like a fruit sorbet, it's pretty much water, sugar, and chocolate with a little vanilla extract and vodka thrown in. The vanilla brings out the flavor and fruitiness of the chocolate, and the vodka keeps the texture smooth and from being too icy. The article accompanying this recipe in Wine Spectator speaks of a true chocolate-lover who dislikes chocolate ice cream because he thinks that the milk and eggs and cream take away from the real flavor of the chocolate. Keep that in mind when you choose a kind of chocolate. It's worth a splurge for this recipe since it is such a crucial ingredient. For real chocolate lovers who want a cool summer treat, this is for you!
Chocolate Sorbet
source: Wine Spectator: July 31, 2010
Ingredients
1 cup water
1/3 cup Dutch process cocoa
1/2 cup sugar
4 oz dark chocolate, chopped or grated
1 tbsp vodka
1/4 tsp vanilla extract
Pinch of salt
Preparation
- Whisk water, cocoa, and sugar over low heat until combined.
- Meanwhile, melt dark chocolate very gently in a double boiler.
- Turn heat under cocoa to medium, stirring constantly, until the liquid just boils.
- Remove from heat, and add melted chocolate, salt, vodka, and vanilla to cocoa mixture. Stir thoroughly.
- Let cool completely, then refrigerate until cold.
- Freeze mixture according to your ice cream maker's instructions.
Monday, June 21, 2010
Chana Masala

For part 2 of what I'm deeming The Fastest (And Most Satisfying) Indian Dinner Ever: this chana masala, which I served with the Five-Minute Indian-Style Cabbage. For about 15 minutes total, this is certainly up there with some of the best Indian food that has come out of my kitchen. Flavorful and complex, I can't really say enough good things about this recipe. It really fits the Food alla Puttanesca criteria well: fast, cheap, and easy but still incredibly tasty and satisfying.
Chana Masala
adapted from: Cate's World Kitchen
Ingredients
1 small onion, minced
1 clove garlic, minced
2 teaspoons ground cumin
1 teaspoon ground coriander
1/2 teaspoon turmeric
1 teaspoon curry powder
1/4 teaspoon salt
1 large Roma tomato, seeded and chopped
1 15oz can chickpeas, not drained (or about 2 cups cooked beans with liquid)
1 teaspoon fresh ginger
Preparation
Heat the oil in a wide skillet over medium high heat, then add the onion and cook, stirring, until it begins to brown (5-7 minutes)
Stir in the garlic, cumin, coriander, turmeric, and curry powder, and let cook for about a minute. Stir in the tomato and cook, stirring, for 2 minutes.
Add the chickpeas and their liquid, turn the head down to medium, and simmer for about 10 minutes, or until it has thickened slightly. Stir in the fresh ginger, taste and add salt if necessary, then serve.
Friday, June 18, 2010
Five-Minute Indian-Style Cabbage

In the part of my life where I worked for an insurance company, one of my co-workers was an Indian women who brought in a smelly, yellow-tinted cabbage dish for lunch. At the time, I was repulsed by it, which was due, in part, to my idea that I didn't like cabbage. I don't know what I thought coleslaw was made out of. When two very large heads of cabbage arrived in my CSA box, I couldn't get that cabbage that my Indian co-worker used to bring out of my head.
This dish is very, very fast and very customizable. Next time, I want to throw a little ginger in and play with the spices a bit. You will want to have everything prepared and on hand before you start because once those mustard seeds start popping out of the oil and flying all over your kitchen, you're going to need to throw the rest of the ingredients in.
Five-Minute Indian-Style Cabbage
source: Herbivoracious
Ingredients
1 tablespoon vegetable oil or ghee (clarified butter), or mustard oil, or more to taste
1 tablespoon black mustard seeds
1/2 teaspoon cumin powder
1/2 teaspoon turmeric powder
1/4 teaspoon cayenne pepper
1 teaspoon salt
optional: garlic, ginger, unsweetened shredded coconut, fresh chilis or dried chili flakes, garam masala
optional garnish: cilantro, lemon juice
Preparation
Heat a large skillet or wok over a medium-high flame. Add the oil, wait 10 seconds, and immediately add the mustard seeds.
As soon as they start to pop, add the rest of the spices and any optional ingredients and stir-fry for 10 more seconds. Move quickly here so you infuse the flavor in the oil but don't burn them.
Add the cabbage and salt, and stir-fry until crisp-tender or tender, your preference. Taste and adjust seasoning.
Garnish with cilantro and/or lemon juice.
Tuesday, June 15, 2010
Chinese Sesame Kale
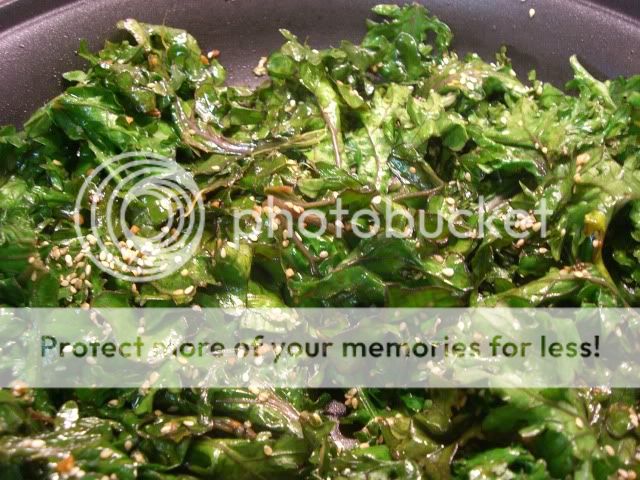
Another summer change to our lifestyle is that we've been having mini-dinner parties on weekdays. We'll have a friend or two over, partially to visit and partially to have someone else help us eat our CSA produce. With the longer, slower days, chatting and lingering on our patio over wine as the fireflies come out doesn't seem quite as indulgent as it does during the rest of the year. It just feels like part of the summer pace. So last night we had a friend, newly moved to Nashville, over for Spicy Asian Marinated Flank Steak, Asian slaw salad, and some of this kale. The recipe for this came from our CSA newsletter from Delvin Farms, and it was a flavorful accompaniment to the rest of the meal.
Chinese Sesame Kale
source: Delvin Farms CSA Newsletter
Ingredients
2 cloves garlic, minced
1 bunch kale (I used Red Russian kale.)
2 teaspoons sesame seed oil
2 tablespoons water
1 teaspoon soy sauce
2 teaspoons toasted sesame seeds (I misread and used 2 tablespoons.)
Salt and pepper, if desired
Preparation
Mince the garlic cloves. Wash kale. Remove and discard the stems from the kale and tear it into bite-size pieces. Save the stems for another use, such as vegetable stock.
Heat the sesame seed oil in the skillet over medium-low heat. Add the minced garlic to the hot oil and sauté for about 20 seconds. Add the kale and water to the garlic and oil, and cover the skillet.
After 1 minute, stir the kale, then re-cover. After 1-2 more minutes, when the kale is wilted, stir in the soy sauce and sesame seeds. If desired, add salt and/or pepper to taste.
Monday, June 14, 2010
Revolutionary Macaroni and Cheese

I know that just looking at it, this does not appear to be revolutionary, but when you see the method, you will be amazed. Get this: you cook the pasta IN the milk. Amazing.
You know how you have those days when you really don't want to make what you planned to make for dinner? I seem to particularly have those days when Joe is on-call or I'm eating dinner alone for some reason, like last Tuesday. And then my friend Erin (One Particular Kitchen Erin, not to be confused with Erin's Food Files Erin even though they're both fellow Nashvillians) mentioned that she had made this macaroni and cheese from Cate's blog. And just like that, I was going to be making macaroni and cheese for dinner. I added some steamed broccoli from our CSA and a bit of tuna and used some smoked Gouda that I had in the fridge. With the whole wheat pasta, I almost didn't feel guilty eating a big bowl of delicious, easy, only-dirtied-one-pot macaroni and cheese for dinner. The sauce was a little on the runny side, but if I had baked it, that problem might have resolved itself.
Revolutionary Macaroni and Cheese
source: Cate's World Kitchen
Ingredients
2 cups dried pasta (I used whole wheat rotini)
2 cups 2% milk
1 cup loosely packed shredded cheddar cheese (I used gouda)
1 tsp salt
1 tsp dijon mustard
1 can tuna (optional)
1 head broccoli, chopped and steamed (optional)
Preparation
Combine the pasta and milk in a saucepan and bring to a simmer. Cook, stirring, with the heat low for about 20 minutes (until the pasta is soft). Make sure the milk doesn’t boil!
Stir in the mustard, salt, and cheese (if you’re going to bake it, reserve about 1/4 cup of the cheese for sprinkling over the top).
Cover and let stand for about 5 minutes, then stir well to serve.
Thursday, June 10, 2010
Bread and Butter Pickles
 Whenever Joe and I are eating something with cucumbers, the cucumbers always end up on my plate, and most of the time, I don't mind. But when our CSA share came with 4 good-sized cucumbers, that was slightly more than I wanted to eat on my own before they went bad. Then I had a flash of genius, or rather, I remembered the Alton Brown episode where he made refrigerator pickles, and I knew the fate of the CSA cucumbers. I only had to acquire a few extra things: canning jars, pickling spice, and celery seeds.
I'm still sort of amazed that I made pickles and that they are very good, so much fresher tasting than the kind you can buy. Plus you can control your own spices. I made four jars, and we've already eaten through one. Alton Brown says that these will last up to 3 months in the refrigerator since the environment is so acidic, but we'll be lucky if these last to the end of the week.
Alton Brown's Bread and Butter Pickles
source: Food Network
Ingredients
* 1/2 onion, thinly sliced
* 2 medium cucumbers, thinly sliced
* 1 cup water
* 1 cup cider vinegar
* 1 1/2 cups sugar
* Pinch kosher salt
* 1/2 teaspoon mustard seeds
* 1/2 teaspoon turmeric
* 1/2 teaspoon celery seeds
* 1/2 teaspoon pickling spice
Preparation
Combine onion and cucumber slices in a clean spring-top jar.
Combine the remaining ingredients in a non-reactive saucepan and bring to a boil. Simmer for 4 full minutes to wake up the flavors of the spices.
Slowly pour the hot pickling liquid over the onion and cucumber slice, completely filling the jar. Allow the pickles to cool to room temperature before topping off with any remaining pickling liquid. Refrigerate.
Tuesday, June 1, 2010
Grits & Greens Casserole
 People who have bought CSA shares before and joked about the kale weren't playing. My first CSA box arrived with a LOT of leafy greens, including a big bunch of kale. Fortunately, I had starred some recipes for using all of that kale, including this casserole.
Bacon has magical powers. Just a few slices really makes this dish and cuts some of the bitterness of the greens. The grits have just enough cheese in them to seem creamy. And you can prepare this casserole up to a day ahead of time. We ate this with some sliced andouille chicken sausage.
Grits & Greens Casserole
source: Eating Well via A Year in the Kitchen
Yields 6 servings
Ingredients
* 4 slices bacon, chopped (optional)
* 2 teaspoons extra-virgin olive oil
* 1 small onion, diced
* 4 cloves garlic, minced
* 2 cups reduced-sodium chicken broth or vegetable broth, divided
* 1/4 teaspoon salt
* 16 cups chopped collard greens or kale, stems removed (about 1 large bunch, 1 1/2-2 pounds)
* 2 cups water, plus more as needed
* 1 cup grits (not instant)
* 3/4 cup shredded extra-sharp Cheddar cheese, divided
* 1/4 cup prepared salsa
* 1 large egg, lightly beaten
Preparation
1. Preheat oven to 400°F. Coat an 8-inch-square baking dish with cooking spray.
2. Place bacon (if using) in a large Dutch oven. Cook over medium heat, stirring often, until crispy, 4 to 6 minutes. Remove with a slotted spoon to a paper towel-lined plate to drain. Pour off the bacon fat.
3. Return the pot to medium-low heat; add oil, onion and garlic and cook, stirring often, until fragrant and starting to brown in spots, 2 to 8 minutes (cooking time will be quicker if you started with bacon). Add 1 cup broth and salt; bring to a boil over high heat. Add collards (or kale); stir until wilted down to about one-third the volume and bright green, 1 to 2 minutes. Cover, reduce heat to medium-low and simmer, stirring occasionally, until tender, 18 to 20 minutes. Adjust heat during cooking to maintain a simmer, and add water, 1/4 cup at a time, if the pan seems dry.
4. Meanwhile, bring 2 cups water and the remaining 1 cup broth to a boil in a large saucepan. Pour in grits in a steady stream, whisking constantly. Bring to a simmer, whisking constantly. Reduce heat to medium-low and cook, whisking often, until thick, about 5 minutes. Combine 1/2 cup cheese, salsa and egg in a small bowl. Remove the grits from the heat and quickly stir in the cheese mixture until combined.
5. Working quickly, spread about half the grits in the prepared baking dish. Top with greens, spreading evenly. Spread the remaining grits over the greens. Sprinkle with the remaining 1/4 cup cheese and the reserved bacon (if using).
6. Bake the casserole until hot and bubbling, about 20 minutes. Let stand for about 10 minutes before serving.
Nutritional Info
Per serving: 226 calories; 8 g fat (3 g sat, 2 g mono); 50 mg cholesterol; 31 g carbohydrates; 0 g added sugars; 11 g protein; 4 g fiber; 473 mg sodium; 335 mg potassium.
Thursday, May 27, 2010
Strawberries Romanoff (and a Bake Sale!)
 In Courtney's post about this dessert, she mentioned La Madeleine, and from that moment, I knew I would be making this. Throw in my quart of delicious local strawberries from our CSA and the fact that I already had all of the ingredients on hand, and I knew this would make a special treat for a weeknight.
The first time I had strawberries Romanoff was at La Madeleine, and it was a bite of someone else's order. The cream was much thicker and more tangy than I anticipated. It's not too sweet but is the perfect accompaniment for those glorious strawberries. I even whipped up the sauce in the morning and stored it until later, making it a great make-ahead dessert for a party.
Strawberries Romanoff
source: Cook Like a Champion
Serves 2
Ingredients
1/4 cup sour cream
1 1/2 teaspoons brown sugar
1 1/2 teaspoons brandy or vanilla
1 1/2 teaspoons sugar
1/4 cup heavy cream
2 cups fresh strawberries, sliced if large
freshly grated nutmeg
Directions
Mix the sour cream, brown sugar and brandy together in a small bowl.
In another bowl, whisk the heavy cream until it thickens slightly, then add sugar. Continue whisking until cream is fluffy.
Gently fold whipped cream into sour cream mixture.
Place strawberries in serving dish of your choice, top with sauce and freshly grated nutmeg.
 Coming up this Saturday, Lindsay from Love and Olive Oil wrangled a bunch of Nashville-area food bloggers together to do a flood benefit bake sale. All proceeds will benefit Second Harvest Food Bank. The Green Wagon in East Nashville (1100 Forrest Ave) has been kind enough to take us on, so we will be there from 1:30-4 pm with our delicious treats. I'll be making these delicious peanut butter cookies. All treats will go for $2. So if you're in the area, come on by and spend some money!
Tuesday, May 25, 2010
Couscous, Lentil, and Arugula Salad
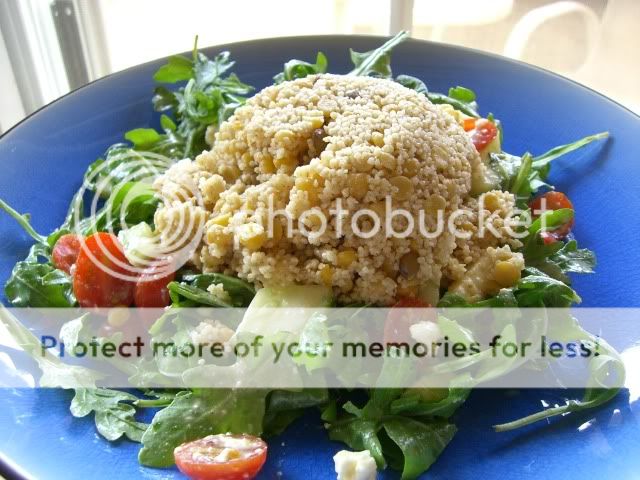 Honestly, I'm not a big salad fan, though over the years I've honed my preferences. I like salads with lots of stuff - a variety of vegetables, cheese, and nuts. I like my salads pre-tossed with the dressing so that it's evenly coated. And I prefer a flavorful vinaigrette to something creamy and gloppy. If I'm going to eat a salad for a main course, it's also got to have something else besides vegetables and dressing. Most people solve this by adding grilled chicken or steak or even cottage cheese or tuna. But this salad adds couscous and lentils.
The recipe for the dressing makes plenty, so feel free to halve it if you don't want the leftovers. Seeing as our first CSA delivery was this past Saturday, I made the whole recipe. This salad was very filling, but it also felt good on a hot evening to eat something so refreshing. I loved the peppery bite of the arugula with the sour tang of the lemon juice and the flavor of the Dijon mustard. I definitely found a salad I like.
Couscous, Lentil, and Arugula Salad with Garlic-Dijon Vinaigrette
source: Eating Well
Yields 4 large servings
Ingredients
Vinaigrette
* 1/2 cup extra-virgin olive oil
* 1/2 cup lemon juice
* 1/2 cup red-wine vinegar
* 1/4 cup Dijon mustard
* 4 small cloves garlic, minced
* 1/2 teaspoon salt
* Freshly ground pepper, to taste
Salad
* 1 1/4 cups vegetable broth, or water
* 1 cup whole-wheat couscous
* 2 1/2 cups water
* 1 cup French green lentils, or brown lentils, rinsed
* 4 cups arugula, any tough stems removed, or mixed salad greens
* 1 small cucumber, peeled, seeded and diced
* 1 cup cherry tomatoes, halved
* 1/2 cup crumbled feta cheese
Preparation
1. To prepare vinaigrette: Combine oil, lemon juice, vinegar, mustard and garlic in a blender, a jar with a tight-fitting lid or a medium bowl. Blend, shake or whisk until smooth. Season with salt and pepper.
2. To prepare salad: Bring 1 1/4 cups broth (or water) to a boil in a small saucepan. Add couscous, cover, remove from the heat and let stand until the liquid is absorbed, about 5 minutes.
3. Combine 2 1/2 cups water and lentils in another saucepan. Bring to a boil, reduce heat to a simmer, cover and cook until just tender, 15 to 25 minutes. (Green lentils will be done sooner than brown lentils.) Be careful not to overcook the lentils or they will fall apart in the salad. Drain any excess water and let cool for about 10 minutes.
4. If arugula leaves are large, tear into bite-size pieces. Toss arugula (or greens) with 1/4 cup of the vinaigrette in a large bowl, then divide among 4 large plates. In the same bowl, toss the couscous and lentils with another 1/4 cup vinaigrette; divide the mixture among the plates. Top each salad with cucumber, tomatoes and feta and drizzle each with 1 tablespoon vinaigrette. (Cover and refrigerate the remaining 1 cup vinaigrette for up to 1 week.)
Nutritional Information
Per serving: 549 calories; 18 g fat (5 g sat, 10 g mono); 17 mg cholesterol; 79 g carbohydrates; 22 g protein; 15 g fiber; 579 mg sodium; 630 mg potassium.
Monday, May 24, 2010
Strawberry, Pistachio, and Goat Cheese Pizza
 In Houston, there was this restaurant right around the corner from my apartment that, in addition to some killer margaritas, had this salad on the menu that included a sort of cheesy pita bread under all of the salad. It was like you were rewarded for eating your salad with some delicious, cheesy flatbread. This pizza is a little bit like that in concept because it's not really a traditional pizza with sauce and cheese and toppings. It's more like salad on top of bread, with which, as I learned from that salad in Houston, there is absolutely nothing wrong.
I had bookmarked this last year as part of a fictional backyard cookout menu that we never got around to hosting. Because, you know, it's totally normal to plan menus for parties that you don't actually have. It was brought to my attention again by Coach Nicole from Sparkpeople, and I decided that this time I would actually make it.
The goat cheese melts a little on the hot crust, and this is just a lovely spring supper with a glass of white wine. It would also make a nice appetizer for a not-so-fictional outdoor party. I substituted arugula for the watercress and really enjoyed the peppery bite of the arugula with the cool sweetness of the strawberries.
Strawberry, Pistachio, and Goat Cheese Pizza
source: Cooking Light May 2009
Serves 6
Ingredients
1 12 oz prebaked whole wheat pizza crust
1/3 cup crumbled goat cheese
1 cup sliced strawberries
1 cup trimmed watercress (or arugula or spinach)
1/2 tsp olive oil
1/2 tsp fresh lemon juice
salt and pepper
1/4 cup shaved fresh Parmigiano-Reggiano cheese
3 tbsp shelled, dry-roasted pistachios, chopped
Preparation
1. Preheat oven to 425-degrees.
2. Place crust on a baking sheet or pizza stone. Bake for 8 minutes. Remove crust from oven and sprinkle goat cheese evenly over the crust.
3. Combine strawberries, watercress, olive oil, juice, salt, and black pepper; toss gently to coat. Arrange strawberry mixture evenly over goat cheese. Sprinkle pizza with Parmigiano-Reggiano and nuts. Cut into 12 wedges. Serve immediately.
Thursday, May 20, 2010
San Juan Puerto Rico Part 2
It's taken me a while to finish up our San Juan trip. Here is Part 1 if you missed it.

We definitely needed the fortification (pun!) for the rest of the day - traipsing around OSJ visiting the forts! Our first stop was Castillo de San Cristobal. The forts are run by the National Park System, and you can buy a pass to both forts for $5 a person. Although El Morro is the more famous of the forts, San Cristobal is much bigger. We were awed. We didn't take an official tour but just used the maps we were given to navigate around. There is also good signage in Spanish and English around the forts.
 Even if you're not that into history, the forts are totally worth it for the views that they afford. You can see all of Old San Juan and down the coast and across land to the cruise ship terminals. We spent a lot of time just enjoying the view and taking pictures of the garitas (the sentry boxes that San Juan is known for). San Cristobal was built to prevent land attacks on San Juan, and the oldest parts of the fort date back to the 1600s.

 This is a view of the other fort, El Morro, from San Cristobal. In between the two are the slums known as La Perla. In the bottom left corner you can see the Devil's Garita. The legend says that sentries were known to disappear from this sentry box as if they were snatched away by the devil. Because we're hardcore, we decided that we wouldn't take the tourist trolley to El Morro but would walk instead. It's a good hike, but we were walking along the coast.
Our second full day in San Juan was designated as our sight-seeing day. However, we woke up later than planned and spent a while waiting for the bus to go into Old San Juan which meant that we didn't arrive in OSJ until nearly 11 am. Having read about Cafe La Mallorca, I wanted to eat breakfast there. I ordered the namesake food, a mallorca, which is kind of sandwich. Mine was made with ham and cheese and then sprinkled with powdered sugar. It's a little like eating a french toast sandwich. Somehow the sweetness and saltiness complement each other beautifully. After we saw the window full of pastries, we decided to get one to split for the road.
We definitely needed the fortification (pun!) for the rest of the day - traipsing around OSJ visiting the forts! Our first stop was Castillo de San Cristobal. The forts are run by the National Park System, and you can buy a pass to both forts for $5 a person. Although El Morro is the more famous of the forts, San Cristobal is much bigger. We were awed. We didn't take an official tour but just used the maps we were given to navigate around. There is also good signage in Spanish and English around the forts.
One of the interesting things about San Cristobal is that it was used by the United States during World War II to look for German U-boats in the Caribbean. You can see how some of the architecture does not exactly match the rest of it. Having a vivid imagination, we spent some time playing in the sentry boxes imagining spotting everything from Dutch war ships to U-boats. Of course, most of the time, the guards didn't see anything except a vast expanse of ocean and the occasional trading vessel. I can imagine it would get pretty lonely in there.
This is a view of the other fort, El Morro, from San Cristobal. In between the two are the slums known as La Perla. In the bottom left corner you can see the Devil's Garita. The legend says that sentries were known to disappear from this sentry box as if they were snatched away by the devil. Because we're hardcore, we decided that we wouldn't take the tourist trolley to El Morro but would walk instead. It's a good hike, but we were walking along the coast.
El Morro gets all the glory, but we honestly liked San Cristobal best. The neat part about El Morro is that it guards the entrance to San Juan Bay, so you can see pretty much all of the bay and watch boats enter. It makes it clear how awesome of a natural bay San Juan bay is. The area on the other side of the entrance to the bay used to be a leper colony. Now it's a recreation area. The other very cool part of El Morro is that, in the oldest part of the fort, there is part of a shell stuck in the wall from when the US attacked San Juan during the Spanish-American war in 1898. Very cool.
Dorky side comment: You know how in the book of Joshua, Rahab, the prostitute who helps the Israelites enter Canaan, lives in the city walls? I never really understood how she could live in the wall until I saw the walls around San Juan. Look at how thick they are! You could totally live in there.
Dorky side comment: You know how in the book of Joshua, Rahab, the prostitute who helps the Israelites enter Canaan, lives in the city walls? I never really understood how she could live in the wall until I saw the walls around San Juan. Look at how thick they are! You could totally live in there.

I was trying to figure out we could get down to the Paseo de la Princesa from El Morro, but I kind of messed up. We still had a nice walk and entered the Paseo once we got to the city gates. In my mind, I could see the ships landing after a long journey from Spain and the dignataries entering through the city gates, straight up to the Cathedral to give thanks to God for a safe journey. We take for granted how safe and easy travel is nowadays! From the city gates we walked back down to the docks, basically completely circling the perimeter of Old San Juan.
Before we boarded the ferry for the Bacardi distillery, we stopped by the tourist information center for a free rum drink sponsored by Rums of Puerto Rico. The bartender was very knowledgable and turned Joe on to some sipping rums. Then we headed next door to Casa de Don Q, an informational museum about Don Q rums, which also had a tasting bar. I had read that you could get one drink, and I assumed that meant that we would get a ticket. However, it is much more laidback than that. We did buy a few bottles of Don Q's coconut and mojito rums though, so it paid off for them!

Finally, we bought our tickets for the ferry to Catano, across the bay where the Bacardi Distillery is located. The fare was something like $.50-$1 per person. Then you can catch a publico (public taxi) that will take you to the Distillery for about $5 per person. The tour at Bacardi is free, and you get two drink tickets. Unfortunately, we were there during Spring Break, so while we were interested in the tour, most of the sunburned college students were only interested in the free drinks. As tours go, it wasn't that great, though you do get an in-depth look at the history of Bacardi, but they don't dwell on their method for making their rums. Bacardi is not originally a Puerto Rican company. They started in Cuba and then moved after Castro took over. We decided to stick to drinking Don Q, a real Puerto Rican rum.
 One benefit is that you get a great view of Old San Juan from across the bay. After taking the ferry back across, we decided to head back to Condado for dinner where we ate at a comida criolla restaurant close-by. Having done all of the tourist things, we were ready to rest our feet and consume some mofongo and a nice cold beer.
The next morning, another planned beach day, we woke up and found it was raining. We stayed in bed hoping it would let up, but it didn't appear to be going anywhere. After doing some quick research, I determined that we were within walking distance of the Museo de Arte de Puerto Rico. On the way, we ate a filling breakfast at Bebo's. The art museum was a really nice way to spend a few hours, particularly if it's raining and you don't have a car. They had everything from 17th-century religious art to modern protest art and a sculpture garden.
By the late afternoon, we were determined to spend some time on the beach, and the rain looked to be letting up. We took a walk down the shore and then enjoyed the little bit of sun that came out right before setting behind the buildings. Because it was out last night in Puerto Rico, we wanted to have a big night out so we went back to our condo and got ready to go out.
We first started with drinks at the Atlantic Beach Hotel. The Atlantic Beach Hotel was one of the few hotels we could see that had an oceanfront bar with a patio. It's also a well-known gay hangout. We enjoyed our beers and talked about where we might go for dinner. Only a short bit down Avenida Ashford was Ummo, where we ended up eating dinner. Joe was keen on a place that had live music, but I was tired of comida criolla. This ended up being absolutely perfect.
 We started off with a tasting of 3 different red wines and some corn and goat cheese empanadas. Then, we decided to order the Parillada Gourmet for two people. It was brought out to us on the table that you see in the picture that had coals inside to keep it warm. It also came with two sides, and we ordered the mashed yucca and creamed spinach. All of the meat you see above includes blood sausage, chorizo, filet mignon, sweetbreads, pork loin, and short ribs along with two sauces for the meat. We were stuffed. Everything was absolutely delicious and flavorful. My only complaint was that the pork was slightly dry. It was one of the best dining experiences I have ever had: the service, the music, the food, and the atmosphere was just perfect.
The next morning, it was raining just a bit, so we grabbed breakfast in Ocean Park. By then, the rain had mostly stopped, so we headed to the beach one last time. We were very, very sad for our vacation to end. We loved San Juan and Puerto Rico so much that our next vacation will most likely be to another part of Puerto Rico, probably Vieques. Before this vacation, we had always talked about retiring to Mexico, but I think those plans have now changed to Puerto Rico. The beauty of the island, the friendliness of the people, and the combination of cultures is really something to behold. We can't wait to get back to Puerto Rico!
One benefit is that you get a great view of Old San Juan from across the bay. After taking the ferry back across, we decided to head back to Condado for dinner where we ate at a comida criolla restaurant close-by. Having done all of the tourist things, we were ready to rest our feet and consume some mofongo and a nice cold beer.The next morning, another planned beach day, we woke up and found it was raining. We stayed in bed hoping it would let up, but it didn't appear to be going anywhere. After doing some quick research, I determined that we were within walking distance of the Museo de Arte de Puerto Rico. On the way, we ate a filling breakfast at Bebo's. The art museum was a really nice way to spend a few hours, particularly if it's raining and you don't have a car. They had everything from 17th-century religious art to modern protest art and a sculpture garden.
By the late afternoon, we were determined to spend some time on the beach, and the rain looked to be letting up. We took a walk down the shore and then enjoyed the little bit of sun that came out right before setting behind the buildings. Because it was out last night in Puerto Rico, we wanted to have a big night out so we went back to our condo and got ready to go out.
We first started with drinks at the Atlantic Beach Hotel. The Atlantic Beach Hotel was one of the few hotels we could see that had an oceanfront bar with a patio. It's also a well-known gay hangout. We enjoyed our beers and talked about where we might go for dinner. Only a short bit down Avenida Ashford was Ummo, where we ended up eating dinner. Joe was keen on a place that had live music, but I was tired of comida criolla. This ended up being absolutely perfect.
We started off with a tasting of 3 different red wines and some corn and goat cheese empanadas. Then, we decided to order the Parillada Gourmet for two people. It was brought out to us on the table that you see in the picture that had coals inside to keep it warm. It also came with two sides, and we ordered the mashed yucca and creamed spinach. All of the meat you see above includes blood sausage, chorizo, filet mignon, sweetbreads, pork loin, and short ribs along with two sauces for the meat. We were stuffed. Everything was absolutely delicious and flavorful. My only complaint was that the pork was slightly dry. It was one of the best dining experiences I have ever had: the service, the music, the food, and the atmosphere was just perfect.The next morning, it was raining just a bit, so we grabbed breakfast in Ocean Park. By then, the rain had mostly stopped, so we headed to the beach one last time. We were very, very sad for our vacation to end. We loved San Juan and Puerto Rico so much that our next vacation will most likely be to another part of Puerto Rico, probably Vieques. Before this vacation, we had always talked about retiring to Mexico, but I think those plans have now changed to Puerto Rico. The beauty of the island, the friendliness of the people, and the combination of cultures is really something to behold. We can't wait to get back to Puerto Rico!
Wednesday, May 19, 2010
Cream Biscuits
 Somewhat shamefully, this was my first time making biscuits. While I was making them, I was thinking of the recently departed Carol Fay Ellison aka the Loveless Cafe biscuit lady. Some of you might recognize her name from Throwdown with Bobby Flay. Even though Bobby Flay won that episode, we all know that Ellison made the best biscuits.
I was really pleased with how easy these biscuits were to make. This recipe calls for a grand total of 6 ingredients. I decided to cut them small as a kind of homage to sliders, and they went perfectly with a dab of preserves alongside our quiche, country ham, fruit salad, and hash brown casserole for Mother's Day brunch.
Cream Biscuits
source: Smitten Kitchen
3 tbsp melted butter
2 cups all-purpose flour, plus more for dusting
1 tbsp baking powder
1/2 tsp salt
1 tbsp sugar (optional)
1 1/2 cups heavy cream
Preparation
Preheat the oven to 425°F. Line a baking sheet with parchment paper. Melt butter in a small pot or microwave dish, and set aside. Sift two cups flour, the baking powder, salt and (if using) sugar into a large bowl. Fold in 1 1/4 cups cream. If the dough is not soft or easily handled, fold in the remaining 1/4 cup cream, little by little.
Turn dough onto a floured surface, mound it into a ball and, using your hands, press it to a thickness of about 3/4 inch. Cut into rounds, 2 1/2 inches in diameter. Gather dough scraps and continue to make rounds. Dip the top of each round in melted butter and arrange on the baking sheet. Bake until golden, 12 to 15 minutes. Serve immediately, or flash freeze for future use. [Biscuits can be baked straight from the freezer, and additional few minutes baking time will be needed, usually around 3 to 5.]
Tuesday, May 18, 2010
Paula Deen's Hash Brown Potato Casserole
 Hashbrown casserole was not something I had ever had until moving to Tennessee. But how to make potatoes even better than by adding butter, sour cream, and cheese? Now, I know that using condensed cream of ___ soups is considered pretty declasse in food circles, but sometimes you just have to own it. There were a lot of things that I had to turn a blind eye to in this casserole, like the two cups of sour cream, but let's not pretend like we all eat like this all the time. It's an indulgence, so treat it like such. It is also delicious - rich, creamy, and decadent. Just make sure you send the leftovers home with your guests.
Paula Deen's Hash Brown Potato Casserole
source: Paula Deen's Kitchen Classics
Serves 10-12
Serves 10-12
Ingredients
2 lbs frozen hash brown potatoes
4 cups grated Cheddar cheese (I reduced this to about 3 cups.)
1 10 1/2 oz can cream of chicken or cream of mushroom soup
2 cups sour cream
1/2 cup (1 stick) melted butter
1 medium onion, chopped
2 tsps The Lady's House Seasoning (salt, black pepper, and garlic powder)
Preparation
Preheat the oven to 350-degrees. In a large bowl, combine the potatoes, 2 cups of the cheddar cheese, the soup, sour cream, butter, onion, and House Seasoning. Place in a buttered 13X9 inch pan and bake for 35 minutes. Remove from the oven and top with the remaining cheese. Return to the oven and bake for 10 minutes longer.
Varation: Instead of topping the casserole with cheese, you may use 2 cups crushed Ritz crackers mixed with a 1/2 cup melted butter.
Friday, May 14, 2010
Hummingbird Cake
 When planning brunch for Mother's Day, I was flipping through my Savannah Desserts cookbook, looking for something that would catch my eye. I wanted something decadent but not heavy and something that I could imagine Paula Deen serving me. Sure enough, this Hummingbird Cake caught my eye. You know, women sometimes are given a hard time for having a sweet tooth, but in my experience, that applies more to chocolate. It is the men I have known who really like their sugar, and this cake has plenty of it.
 This is a different style of cake, very dense and moist, almost more like the texture of banana bread. The pineapple, banana, and oil make it so tender, and the pecans vary the texture of the cake. Next time, I might roast the pecans to deepen the flavor even more. The whole thing is topped off with a sugary cream cheese frosting. This sure was a big hit, and it went so well with the overall theme of the brunch.
Hummingbird Cake
source: Savannah Rum Runners Bakery in Savannah Classic Desserts by Janice Shay
Ingredients
3 cups unbleached all-purpose flour
2 cups granulated sugar
1 tsp salt
1 tsp ground cinnamon
1/2 tsp baking powder
3 large eggs, beaten
1 1/2 cups vegetable oil
1 (11 oz) can crushed pineapple, with juice (I used an 8 oz can.)
2 cups diced bananas
2 cups pecans (I had 1 1/2 cups, which was plenty)
1 1/2 tsp vanilla extract
Icing:
1 8 oz package cream cheese, at room temperature
1 tsp vanilla extract
4 1/2 cups confectioners' sugar (I ended up only using 3 1/2 cups.)
Preparation
Preheat the oven to 350-degrees F. Butter two 9-inch cake pans.
To make the cake, combine the flour, sugar, salt, cinnamon, and baking powder in a large bowl. Mix until well-blended with a wire whisk. Add the eggs and oil and stir with a wooden spoon until moist. Add the pineapple, bananas, pecans, and vanilla. Stir until well-blended. Pour into the prepared pans.
Bake for 25 minutes (Mine took closer to 35), or until a tester inserted near the center of one of the cakes comes out clean.
Cool on a wire rack for 10 minutes. Invert onto racks and remove the pans. Finish cooling before frosting.
To make the icing, beat the cream cheese and vanilla until very soft. Add the confectioners' sugar gradually, beating until fully blended and a soft spreading consistency has been reached. Add a little milk if necessary to achieve a spreading consistency. Spread over the top of one layer. Set the second layer on top and frost the top and sides of the cake.
Thursday, May 13, 2010
Eat Out for Nashville - Monday, May 17th

I'll admit, one of the things I complain about the most with regards to Nashville is the food. The vast expanse of restaurants in Houston completely spoiled me, and I definitely have my Tex-Mex cravings. However, the somewhat smaller food scene that comes with a smaller city also means that I have had the opportunity to be a part of it from attending the Iron Fork competition to regularly commenting on the Nashville Scene Bites blog to getting to know other Nashville food bloggers and writers. That kind of thing didn't happen in Houston. As a part of that, the restaurant scene has come together to help support flood victims and rebuild our city with Eat Out for Nashville this coming Monday.
When you eat out at any of the participating restaurants this coming Monday, they will donate 50% of their proceeds to the Tennessee Emergency Response Fund of the Community Fund of Middle Tennessee. This is a great way to help that only requires that we do what we all have to do anyway - eat. You can help our great city without even tearing up floorboards or ripping up carpet. Doug Hogrefe of Amerigo, who is so community-minded and generous, helped get this off of the ground, but many other restaurants have signed on. For more information, follow @EatOutforNash on Twitter or go to http://eatoutfornashville.org. Check there often as more restaurants are being added every day!
So who is with me in eating out for Nashville this Monday?
Here is a list of currently participating restaurants:
Amerigo-West End
1922 West End Avenue
Nashville, Tennessee 37203
(615) 321-6024
Amerigo-Cool Springs
1656 Westgate Circle
Brentwood, Tennessee 37027
(615) 377-7070
Baja Burrito
722 Thompson Lane
Nashville, TN 37204
(615) 383-2252
Burger Up
2901 12th Avenue South
Nashville, TN 37204-2509
(615) 279-3767
The Garden Brunch Café (breakfast and lunch only)
924 Jefferson Street
Nashville, TN 37208
(615) 891-1217
Holland House Bar and Refuge
935 W. Eastland Ave.
Nashville, TN 37206
(615) 262-4190
Lazzaroli’s Pasta
1314 5th Avenue North
Nashville, TN 37208-1600
(615) 291-9922
The Melting Pot
166 Second Avenue N.
Nashville, TN 37201
(615) 742-4970
Menchie’s Frozen Yogurt
Nashville, TN 37211
(615) 730-7855
Nuvo Burrito
1000 Main Street
Nashville, TN 37206
(615) 866-9713
O'Charley's
923 Bell Road, Antioch
100 E. Park Drive, Brentwood
2792 Wilma Rudolph Boulevard, Clarksville
202 North James Campbell Boulevard, Columbia
1401 Interstate Drive, Cookeville
2409 Highway 46 South, Dickson
1202 Murfreesboro Road, Franklin
1009 Village Green Crossing, Gallatin
912 Rivergate Parkway, Goodlettsville
212 Indian Lake Boulevard, Hendersonville
5500 Old Hickory Boulevard, Hermitage
4223 Ft. Campbell Boulevard, Hopkinsville
902 Murfreesboro Road, Lebanon
2367 Hillsboro Boulevard, Manchester
401 S. Mt. Juliet Road, Ste 125, Mt. Juliet
1006 Memorial Boulevard, Murfreesboro
2450 Old Fort Parkway, Murfreesboro
1108 Murfreesboro Road, Nashville
17 White Bridge Road, Nashville
110 Coley Davis Court (Bellevue), Nashville
820 Expo Drive, Smyrna
2000 Crossing Circle, Spring Hill
3535 Tom Austin Highway, Springfield
Paradise Park Trailer Resort
411 Broadway
Nashville, TN 37203
(615) 251-1515
The Patterson House
1711 Division Street
Nashville, TN 37203
(615) 244-7989
The Perch
117a Franklin Road
Brentwood, TN 37027
(615) 661-9008
Stoney River Legendary Steaks
1726 Galleria Boulevard, Cool Springs
3015 West End Avenue, Nashville
Subscribe to:
Posts (Atom)